Context
I was recently tasked with reaching out to people who demoed products on our website and see if there are any genuine leads. The only information I had was their email, what product they tried and the country they were from. I realized I have to first reach out to all of them through mail and take it forward when I get a response. With limited information available, I had to use a generic template for the mail content and send a bunch of emails and this needs to be done frequently. I wasn’t exactly thrilled about the idea and since I’ve been learning python recently, I thought why not automate this? Now, my interaction with automation before this point was only with my old laptop that used to shut down on its own. So, this is quite new to me and you will understand that once you go through the tutorial. In the spirit of embracing the noobness, I may explain some very basic stuff I figured out as well, this is also to encourage anyone who has no experience in python to try this because If I can do it, anyone can do it.
Tutorial
In this post, we will be looking at setting up a script to send out emails from Outlook using the O365 library in python. There are alternate ways to do this, especially for your personal account using SMTP (Simple Mail Transfer Protocol) which is a built-in library in python. You can refer to this tutorial to set it up. But if you want to set it up on your work account (in my case Outlook), that won’t work as there are additional layers of security. Which is why we will be using the O365 library for it. I will only get into setting up basic capabilities like sending emails but there’s a lot of stuff you can do using O365. You’ll find more information on that here
Setting up
We first need to install the O365 library to do so just run pip install O365 wherever you are running python (I’m assuming you’ve already set it up. If not, I suggest using jupyter notebook - Anaconda).
The first step to be able to work with this library is to register an application on Azure portal and retrieve the auth token
Authentication steps
1) You first need to register a new application on Azure portal (App Registrations)
- Log in to Azure portal using the mail id you want to set up the authentication for
- Register a new application and name it
- In the Supported account types select ‘Accounts in any organizational directory (Any Azure AD directory - Multitenant) and personal Microsoft accounts (e.g. Skype, Xbox)’
- Set the redirect URI (Web) to: “https://login.microsoftonline.com/common/oauth2/nativeclient” and click register
- Copy the Application (Client) ID and the Directory (tenant) ID. You’ll need these values later
- Under “Certificates & secrets” on the menu on the left, generate a new client secret. Set the expiration preferably to never. Write down the ‘Value’ of the client secret created now. It will be hidden later on
- Under API permissions, click on add permissions and select ‘Microsoft Graph’ as the API
- Go to delegated permissions and add the scope of the Authentication - this basically means, you need to select the functionalities you want this authentication to have. Here, we need it to be able to send emails. So we select all the scoped under Mail like ‘Mail.Read’, ‘Mail.ReadWrite’, ‘Mail.Send’. Don’t forget to add ‘Offline_access’, we need this for the library to refresh our authentication token which expires every hour
- Click on Add permissions. Like I mentioned before, there are many other functionalities that you can add, check here
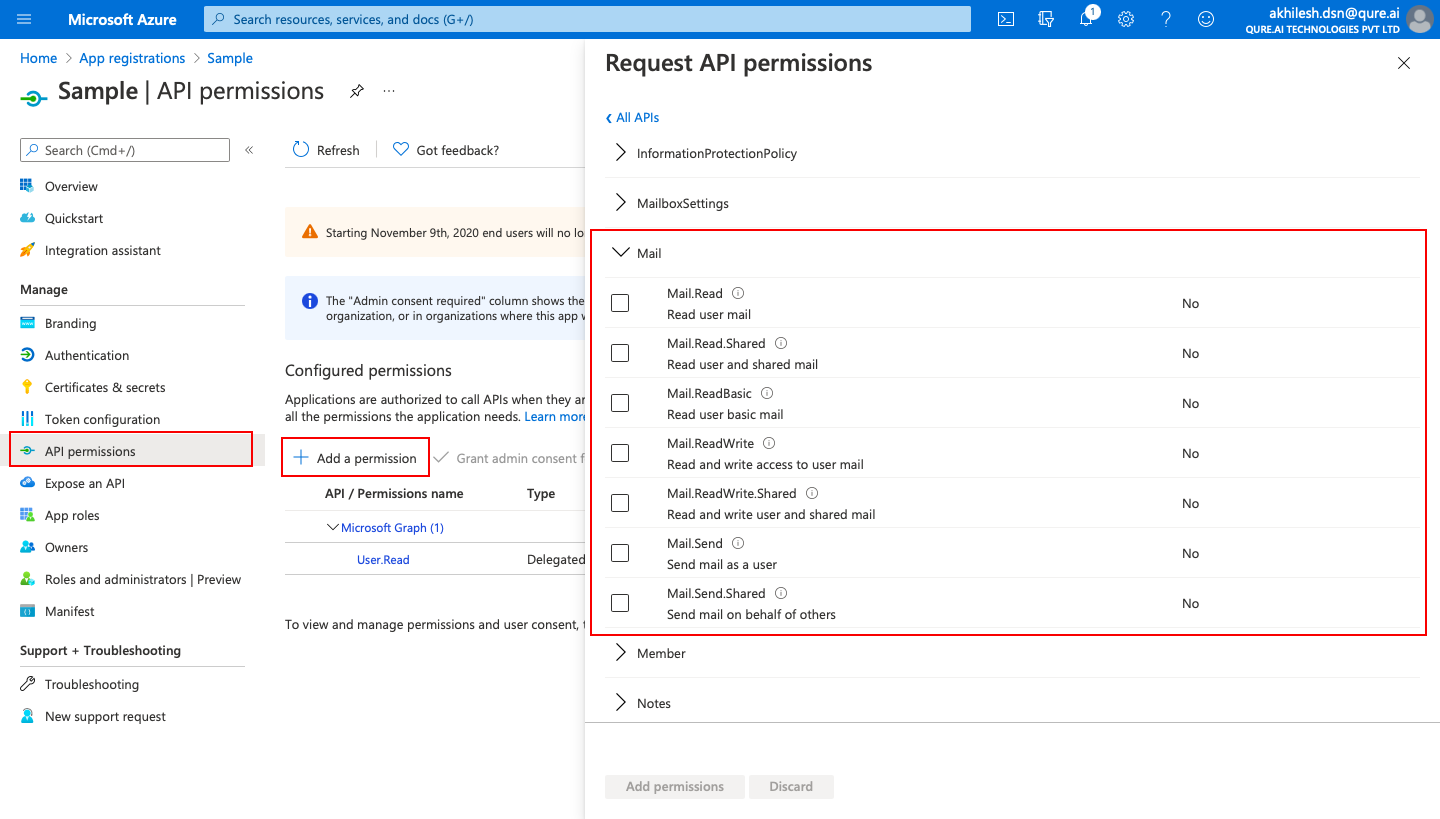
Adding permissions on Azure portal
2) Now we need to login for the first time and generate an Authentication token. We will do from our python script
- Create a new python file and run the following:
from O365 import Account
credentials = ('client_id','client_secret')#These are the values you copied earlier
# Directory (tenant) ID copied earlier
account = Account(credentials, tenant_id='429de9c6-*************')
if account.authenticate(scopes=['basic', 'message_all']):
	print('Authenticated!')#Let's you know if the authentication was successful
You will see a link generated once you run this script. Click on it and it will ask you to log in to your Outlook account. You will be redirected to a page once you logged in. Copy the Authenticated URL back where you ran the script. You should see ‘Authenticated!’
That’s it!
Sending the emails
We are all set to send mails from the script. I’ll go through how to send mails from this library with an example. In my case, I had a file with names and email ids like I mentioned. I will make use of that to send mails
- Drafting and sending mail using O365 is fairly simple. The basic commands we need to know are
message=Account.new_message() creates a new email object - ‘message’message.to.add(['example1@example.com', 'example2@example.com']) will add recipients of the mail- You can add email body content using
message.body = 'Text in the email body'
- You can also add attachments using
message.attachments.add('file path')
message.send will send the message
- In the example code below, I used
pandas to load and manipulate the file with the lead name and email ids. If you wish to quickly understand the commands used below, you can refer to the first six segments of this video or take a look at pandas documentation
- The file I’m using has the following columns: username, user email id, send (whether I wish to send an email to the user or not)
| username |
email |
send |
| User1 |
user1@example.com |
Yes |
| User2 |
user2@example.com |
No |
| User3 |
user3@example.com |
Yes |
| User4 |
user4@example.com |
Yes |
The following is the example code:
import pandas as pd #pandas for reading and manipulating the customer data

from O365 import Account

df=pd.read_csv('file_path') #reading the file
print(df.head()) #to check how the file looks

#selecting the customers we want to send the mail to
dff=df.loc[df['send']=="Yes"]

#accessing the account through Azure application
credentials = ('client_id','client_secret')
account = Account(credentials,tenant_id='429de9c6-7968-48e9-9601-d3bd6c6424bb')

for index,row in dff.iterrows(): #loop send mails to one customer in each iteration
	m = account.new_message() #creates a new mail draft
	m.to.add(row['email']) #takes the email id from our file
	m.subject = 'Hope you liked the demo' #subject of the mail
	m.body = "Hi "+str(row['username'])+"!<br><br>This is Akhilesh, Business Development Manager. I noticed that you tried products on our demo portal. I appreciate your interest in our product.<br><br>I was hoping we could get in touch and figure out what your exact requirement is." #adding mail body
	m.send() # sending the mail and the loop repeats for all the selected customers
Thank you for reading!! Hope it helps